
Integrating a chat widget into your store with bitChat makes it easy for customers to reach you directly. Whether you're using Shopify or another platform, this guide will show you how to set up, customize, and optimize your chat widget for a seamless customer support experience.
Step 1: Navigate to bitChat
- Go to bitChat Chat widget dashboard.
Step 2: Enable bitChat on Shopify Theme
- Click "Enable Now" to start configuring your chat widget.

- In the Shopify theme, search “bitChat” and click to enable it. Then, click on the “save” button located in the top-right corner of the page to save your changes.

Step 3: Configure Contact Information
- Choose to add your phone number or connect your WhatsApp API or Business App. For detailed guides, see How to Connect WhatsApp Business App with bitbybit or How to Create and Connect WhatsApp Cloud API with bitbybit.

- You can customize your widget “WhatsApp button text” and your “pre-filled message”. Also select to Include your customer's current page URL & Chat ID when the customer sends a message.

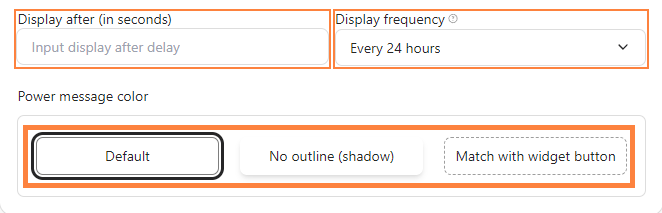
Step 4: Customize Power Message
- Enable toggle “Power message” to display a timed message above your chat widget.

- Fill in the "Header", "Description".

- Set timing and pick the message color.
Step 5: Set Up Quick Responses
- Enable the "Quick response" toggle.

- Enter trigger button text and select the “chatbot” to trigger specific responses. See How to Create A Chatbot Flow for the details.

Step 6: Optimize Your Social media Chat Widget
- Enable the "Social media" toggle desired to reach you through their preferred social media platforms.

- Insert your social media account and click "Save".

To embed chat widget to your code without integration with Shopify, enter this embed code:
- Copy and paste the code below after the <head> tag
<link rel="stylesheet" href="https://cdn1.bitbybit.studio/bitbybit/static/bitChat_widget/widget.css" />
- Then, copy and paste the code below before the start of the last element in the <body> tag
<script src="https://cdn1.bitbybit.studio/bitbybit/static/bitChat_widget/widget.js"></script><script> BBBWidget.init({
"showQuickResponse": false,
"quickResponsesData": [],
"themeColor": "#262627",
"widgetText": "Need Help?",
"radiusType": "circle",
"widgetIconType": "whatsapp",
"position": "right",
"storeLogo": "https://bbb.sgp1.digitaloceanspaces.com/bitbybit/files/563/Untitled design 4-2556.png",
"storeName": "bitbybit",
"storeDescription": "How we can help?",
"size": "small",
"showCard": true,
"widgetColor1": "#262627",
"widgetColor2": "#008069",
"widgetColorType": "solid",
"social": {
"socialOrders": [
"email",
"instagram",
"x",
"facebook",
"tiktok"
],
"values": {
"instagram": {
"enabled": false,
"value": ""
},
"facebook": {
"enabled": false,
"value": ""
},
"email": {
"enabled": true,
"value": "info@bitbybit.studio"
},
"x": {
"enabled": false,
"value": ""
},
"tiktok": {
"enabled": false,
"value": ""
}
}
},
"socialColorType": "custom",
"socialColorCustom": "#232323",
"powerMsgEnabled": false,
"powerMsgHeader": "Help center",
"powerMsgDescription": "How can we help?",
"powerMsgDisplayDelay": "10",
"powerMsgDisplayFrequency": "every_24_hours",
"powerMsgColor": "default",
"whatsappButtonText": "WhatsApp Support",
"whatsappPhone": "6281514231000",
"whatsappPrefilledText": "Hello bitbybit team, I need some assistance: {{url}}"
} );</script>